Actions Group
|
In this article |
Shred Location Button

When using Agent software, version 5.0 or later, it is possible to shred files containing matches that reside on managed endpoints. Selecting one or more results and clicking the Shred Location button schedules that action for the appropriate endpoint. You are not presented with a confirmation dialog asking you to confirm the action. Once the action is scheduled, the endpoint obtains the shred instructions the next time it polls and executes the action and then transmit success or failure information back to the Console. It is important to note that the shred is executed by the endpoint service in the context under which the service is running - SYSTEM or root. Therefore, if the SYSTEM or root account does not have access to the location (because of file or network permissions), the shred fails.
The results of the shred can be viewed in the Match and Action History available by double-clicking a result or by using the Details button.
To cancel a scheduled action, click the Shred Location button again to be prompted to clear the action. If the endpoint has already received the request, it cannot be canceled.
After clicking Shred Location, any of the following dialogs may display:
- The action(s) have been successfully scheduled.
- The action(s) have been successfully cleared.
- The action is already scheduled for the selected locations. Do you want to clear it?
- The selected location already has a Quarantine action scheduled. Do you want to replace or clear it?
- Some of the selected locations already have actions scheduled. Do you want to replace or clear them?
- The requested action could not be scheduled because the Console is awaiting confirmation for a previous request from the endpoint(s).
- The requested action could not be cleared because the Console is awaiting confirmation for a previous request from the endpoint(s).
- The requested action has been received by the endpoint, but the endpoint has not yet indicated that the action was completed. Do you want to request the action again or clear it?
- Another requested action has been received by the endpoint, but the endpoint has not yet indicated that the action was completed. Do you want to request the new action or clear the existing one?
- The action(s) have been cleared but they will still be performed by the endpoint as they have already been received.
- This can occur when the Agent retrieves the action while the Console is waiting for the user to specify if the action should be replaced or cleared. Because the Agent has already processed the action, the clear has no effect.
Note: If Restrict this access to owners/assignees is enabled on the Application Settings page, the user needs to be the owner or assignee by name or role in order to perform the action.
Note: Shred for Exchange only works for newer results (10.0 and newer). Old results imported before 10.0 does not have the information needed to shred and the action is disabled.
Redact Button

When using Agent software, it is possible to Redact files containing matches that reside on managed endpoints. Selecting one or more results and clicking the Redact button schedules that action for the appropriate endpoint. You are not presented with a confirmation dialog asking you to confirm the action. Once the action is scheduled, the endpoint obtains the Redact instructions the next time it polls and executes the action and then transmit success or failure information back to the Console. It is important to note that the redact is executed by the endpoint service in the context under which the service is running - SYSTEM or root. Therefore, if the SYSTEM or root account does not have access to the location (because of file or network permissions), the redact fails.
The results of the redact can be viewed in the Match and Action History available by double-clicking on a result or by using the Details button.
To cancel a scheduled action, click the Redact button again to be prompted to clear the action. If the endpoint has already received the request, it cannot be canceled.
After clicking Redact, any of the following dialogs may display:
- The action(s) have been successfully scheduled.
- The action(s) have been successfully cleared.
- The action is already scheduled for the selected locations. Do you want to clear it?
- The selected location already has a Redact action scheduled. Do you want to replace or clear it?
- Some of the selected locations already have actions scheduled. Do you want to replace or clear them?
- The requested action could not be scheduled because the Console is awaiting confirmation for a previous request from the endpoint(s).
- The requested action could not be cleared because the Console is awaiting confirmation for a previous request from the endpoint(s).
- The requested action has been received by the endpoint, but the endpoint has not yet indicated that the action was completed. Do you want to request the new action or clear it?
- Another requested action has been received by the endpoint, but the endpoint has not yet indicated that the action was completed. Do you want to request the new action or clear the existing one?
- The action(s) have been cleared but they will still be performed by the endpoint as they have already been received.
- This can occur when the Agent retrieves the action while the Console is waiting for the user to specify if the action should be replaced or cleared. Because the Agent has already processed the action, the clear has no effect.
Note: You may only redact Office 2007 and higher files (for example, docx, xlsx, pptx) and text files (i.e., *.txt, *.log, *.ini). If you would like to add additional extensions to be considered text, like *.bak, you may override default search filters so that those file types are treated as text. This can be configured via policy in the following setting: Settings\Locations\Files\FileExtensions\TextFiles. Redact does not work for matches which have been masked using the Mask matches during import setting.
Quarantine Location Button

When using Agent software, version 5.0 or later, it is possible to quarantine files containing matches that reside on managed endpoints. Selecting one or more results and clicking the Quarantine Location button schedules that action for the appropriate endpoint. Once the action is scheduled, the endpoint obtains the quarantine instructions the next time it polls and executes the action and then transmit success or failure information back to the Console. It is important to note that the quarantine is executed by the endpoint service in the context under which the service is running - SYSTEM or root. Therefore, if the SYSTEM or root account does not have access to the location (because of file or network permissions), the quarantine fails.
Shadow files cannot be quarantined.
The results of the quarantine can be viewed in the Match and Action History available by double-clicking on a result or by using the Details button.
To cancel a scheduled action, click the Quarantine Location button again to be prompted to clear the action. If the endpoint has already received the request, it cannot be canceled.
After clicking Quarantine Location, any of the following dialogs may be displayed:
- The action(s) have been successfully scheduled.
- The action(s) have been successfully cleared.
- The action is already scheduled for the selected locations. Do you want to clear it?
- The selected location already has a Shred action scheduled. Do you want to replace or clear it?
- Some of the selected locations already have actions scheduled. Do you want to replace or clear them?
- The requested action could not be scheduled because the Console is awaiting confirmation for a previous request from the endpoint(s).
- The requested action could not be cleared because the Console is awaiting confirmation for a previous request from the endpoint(s).
- The requested action has been received by the endpoint, but the endpoint has not yet indicated that the action was completed. Do you want to request the action again or clear it?
- Another requested action has been received by the endpoint, but the endpoint has not yet indicated that the action was completed. Do you want to request the new action or clear the existing one?
- The action(s) have been cleared but they will still be performed by the endpoint as they have already been received.
- This can occur when the Agent retrieves the action while the Console is waiting for the user to specify if the action should be replaced or cleared. Because the Agent has already processed the action, the clear has no effect.
Restrict Access Button

The Restrict Access button allows you to define the permissions for the selected files on a managed endpoint or remote location. To remove the permissions select one or more files by single clicking with the left mouse button to highlight it and click the Restrict Access button on the Actions ribbon. Updating permissions on remote machines may require you to enter credentials in the Remote Machines section of the Search Locations section of a System Policy applied to the endpoint that is performing the action. The Restrict Access dialog displays with the following options:
- File Owner (Windows Only) - Leaving this option unchecked clears the permissions for the file owner. Selecting this option retains the permissions that are currently set for the file owner.
- Administrators (Windows Only) - Leaving this option unchecked clears the permissions for the administrator. Selecting this option retains the permissions that are currently set for the administrator.
- System (Windows Only) - Leaving this option unchecked clears the permissions for the system. Selecting this option retains the permissions that are currently set for the system.
- User (Mac/Linux Only) - Leaving this option unchecked clears the permissions for the user. Selecting this option retains the permissions that are currently set for the user.
- Group (Mac/Linux Only) - Leaving this option unchecked clears the permissions for the group. Selecting this option retains the permissions that are currently set for the group.
To remove all permissions for a role leave the selection unchecked. To retain the existing permissions for a role single left click the role to place a checkmark in the box next to the role. Clicking the OK button schedules that action for the appropriate endpoint. If the selected file(s) are all on Windows machines, you see just the Windows options. If the selected file(s) are all on Mac/Linux machines, you see just the Mac/Linux options. If the selected files are a mix of Windowns/Mac/Linux, you see options for all.
Mac/Linux:When you click OK the endpoint changes the permissions on the selected files to -RWX (Read, Write, Execute) for those that are unchecked (User, Group) and retains the existing permissions for those that are checked. If you click OK with all check boxes cleared, the permissions for the target file(s) is blank.
Windows: When you click OK, the endpoint removes the permissions (Modify, Read, Execute) on the selected files for those that are unchecked (File Owner, Administrators, System) and retains the existing permissions for those that are checked. If you click OK with all check boxes cleared, the permissions for the target file(s) is blank.
Note: Updating permissions on remote machines only works between machines of the same OS type. For example, Windows modifying permissions to a remote Windows machine or Macs modifying permissions to a remote Mac work. However, Windows modifying permissions to a remote Linux or Mac do not work.
Ignore Button

When a search finds a match or a location that you do not care about, you may wish to use the Ignore feature to prevent that information from being displayed or searched in the future. Selecting one or more results and clicking the Ignore button and then selecting This Location or This Match, schedules that action for the appropriate endpoint. Once the action is scheduled, the endpoint obtains the ignore instructions the next time it polls and executes the action and then transmit success or failure information back to the Console.
Note: If Restrict this access to owners/assignees is enabled on the Application Settings page, the user needs to be the owner or assignee by name or role in order to perform the action.Ignore -This Location

When a search finds matches in a location that you do not care about, using the Ignore This Location feature prevents that location from being searched in the future. For example, there may be a website for which you use a public login or a specific file you don't want to search. When this happens, you can tell the endpoint to ignore those locations for the current and future searches. Ignored locations are added to an approved exception list, the Ignore List, so you never see them again.
To use this feature:
- Single click the match that you wish to ignore with the left mouse button to highlight it and click the Ignore button in the Actions ribbon group, then highlight and left-click on This Location.
- The endpoint is scheduled to ignore the location and you receive a confirmation dialog that reads, "The action has been successfully scheduled."
Additionally, you may choose to require a reason as to why the selected location is being ignored. See Ask for the reason when ignoring results to enable this feature.
To cancel a scheduled, ignore action, click the Ignore This Location button again to be prompted to clear the action.
Note: If the endpoint has already received the request, it cannot be canceled.
Ignore -This Match

Use Ignore to not perform search on a particulare location. This Match feature prevents that information from being displayed in the future. For example, a search may uncover a sample credit card number inside a temporary Internet file or a public password you do not want to encrypt. In this case, you can ignore those matches for the current and future searches. Ignored matches are added to an approved exception list, the Ignore List, so you never see them again.
To use this feature:
- Single click the match that you wish to ignore with the left mouse button to highlight it and click the Ignore button on the Actions ribbon, then highlight and left-click on This Match.
- The endpoint is scheduled to ignore the match and you receive a confirmation dialog that reads, "The action has been successfully scheduled."
Additionally, you may choose to require a reason as to why the selected match is being ignored. See Ask for the reason when ignoring results to enable this feature.
To cancel a scheduled ignore action, click the Ignore This Match button again to be prompted to clear the action. If the endpoint has already received the request, it cannot be canceled.
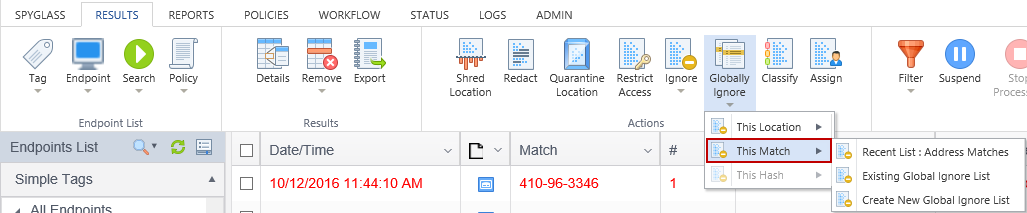
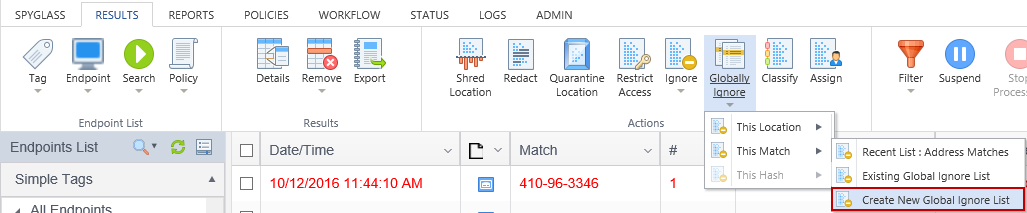
Globally Ignore Button

The Globally Ignore button allows you to create Global Ignore Lists which specify information that Agents ignore during their searches. The specified information is always ignored regardless of other settings on the Agent.
Global Ignore Lists can include matches (for example a sample social security number of 123-12-1234), locations (such as c:\sample files\hr form.doc), or file hashes (a representation of the contents of a file which allow it to be ignored regardless of its file name or location). Global Ignore Lists are assigned to policies and only affects the endpoints to which the policy containing the list is applied.
Global Ignore Lists can be created with data from existing results using the Globally Ignore button or by directly entering information via the Global Ignore Lists settings page.
File Hashes are not created by default and must be explicitly enabled.
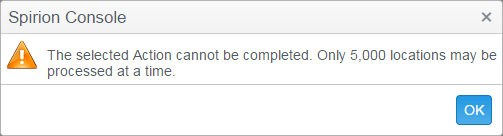
Note: Globally Ignore commands can only be executed when the selected locations, matches, or hashes is <= 5,000. This may not be the actual number of rows selected as duplicate matches, locations, or hashes could be present in the selection. If you attempt to globally ignore more than 5,000 the following dialog displays:
This Location

Select This Location to add the location (for example, the full path to a file) of the selected result to a Global Ignore List.
Note: The Global Ignore List must be assigned to a policy in order to have an effect on any searches.
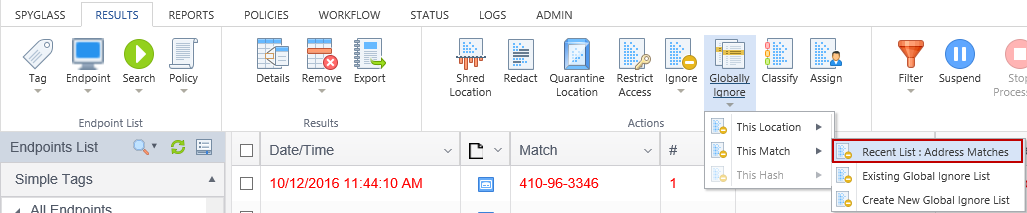
Recent List: <listname>

The name of the most recently used Global Ignore List displays, allowing you to quickly add multiple items to that list without having to use the Existing Global Ignore list dialog every time.
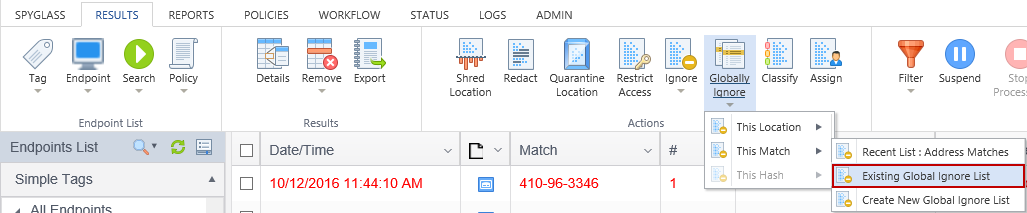
Existing Global Ignore List

Select this item to select an Existing Global Ignore List. The Add to Global Ignore List dialog displays and a list of all available Global Ignore Lists displays in a drop-down box next to Select List.
Create New Global Ignore List

Select this item to Create a New Global Ignore List and automatically add this location to that list. The Add to Global Ignore List dialog displays. Next to New List name is a text box in which to type the name of the list to create. If a list by that name exists, an error displays "This list name is already in use." Use the settings page to see the full list of Global Ignore Lists.
This Match
Select This Match to add the match (for example, 123-12-1234 (as an example ssn)) of the selected result to a Global Ignore List.
Note: the Global Ignore List must be assigned to a policy in order to have an effect on any searches.
Recent List: <listname>
The name of the most recently used Global Ignore List displays, allowing you to quickly add multiple items to that list without having to use the Existing Global Ignore list dialog every time.
Existing Global Ignore List
Select this item to select an Existing Global Ignore List. The Add to Global Ignore List dialog displays and a list of all available Global Ignore Lists displays in a drop-down box next to Select List.
Create New Global Ignore List
Select this item to Create a New Global Ignore List and automatically add this match to that list. The Add to Global Ignore List dialog displays. Next to New List name is a text box in which to type the name of the list to create. If a list by that name exists, an error displays "This list name is already in use." Use the settings page to see the full list of Global Ignore Lists.
This Hash
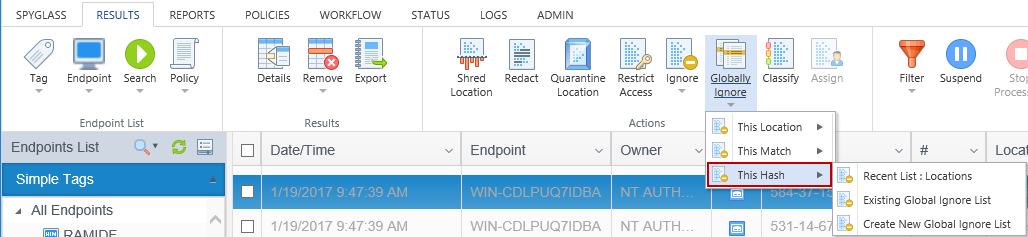
Select This Hash to add the file hash of the selected result to a Global Ignore List. This menu item is only enabled when the selected location contains a file hash. File hashes are created by Agents and sent to the Console when configured to do so. By default, however, the Agent does not create hashes.
To use file hashes in a Global Ignore List, the Agent must first be configured appropriately. The policy setting, Settings\Actions\Ignore\StorageMethod, must be set to 2 (Use Administrator Databases/Ignore Files By Hash). There are other implications to changing this setting, so it is important to review the setting detail before modifying it.
Agents that are configured to Use Administrator Databases/Ignore Files by Hash will not persist any ignored locations across user sessions. When users perform Ignore actions, that information is sent to the Console. Before this file is ignored on a subsequent search, a Console administrator must "approve" the ignore. This "approval" is a loose term and is accomplished simply by adding an ignored match to a Global Ignore List and adding that Global Ignore List to a policy.
Match information is kept securely on the endpoint with a machine key.
Note: the Global Ignore List must be assigned to a policy in order to have an effect on any searches.
Recent List: <listname>
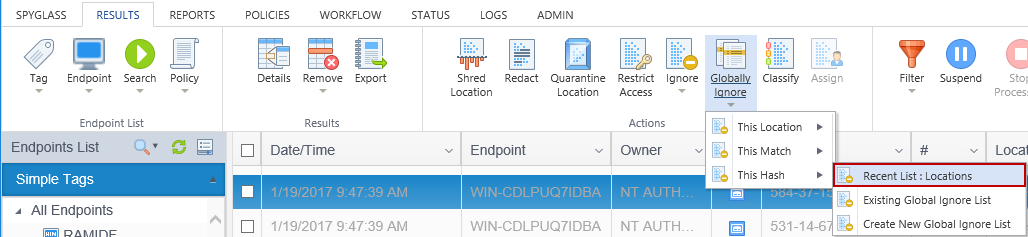
The name of the most recently used Global Ignore List displays, allowing you to quickly add multiple items to that list without having to use the Existing Global Ignore list dialog every time.
Existing Global Ignore List

Select this item to select an Existing Global Ignore List. The Add to Global Ignore List dialog displays and a list of all available Global Ignore Lists displays in a drop-down box next to Select List.
Create New Global Ignore List
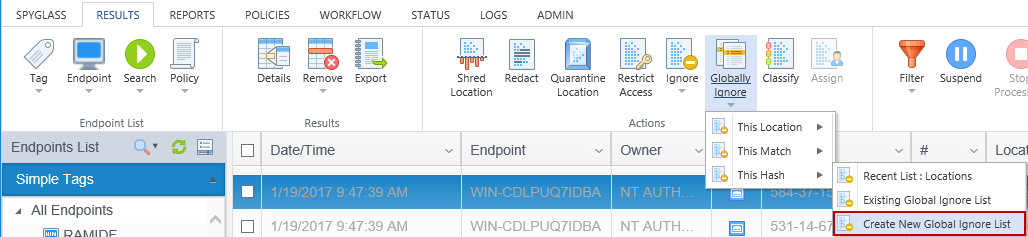
Select this item to Create a New Global Ignore List and automatically add this file hash to that list. The Add to Global Ignore List dialogdisplays. Next to New List name is a text box in which to type the name of the list to create. If a list by that name exists, an error displays "This list name is already in use." Use the settings page to see the full list of Global Ignore Lists.
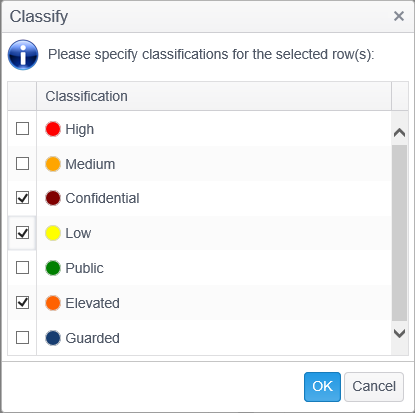
Classify Button

The Classify button allows you to assign a classification to the selected result. The classification displays in the Classification column of the results grid and can be used for reporting purposes in a report. Classifications may be defined on the Workflows tab. Classification are assigned by location. So if there are multiple matches within one location, then the entire location and all results within that location will be assigned the same classification.
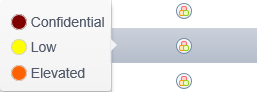
To assign a classification, single click the match that you wish to classify with the left mouse button to highlight it and click the Classify button on the Actions ribbon. The Classify dialog will open. Select a classification or multiple classifications from the drop down list and click OK. The classification column changes to the color corresponding to the classification(s) which you selecting. Hovering the mouse over the classification column displays the classification name. A notification is not sent when classifications are manually assigned.
This is the Classify dialog while the drop-down list is being edited.
This is the Classification column after the drop down list has been edited.
Assign Button

The Assign button allows you specify the user or users who are assigned to a result. A result can be assigned to multiple users or none at all. When a location has been assigned to a user, it displays in the Assignee column on the Results Grid and a notification is sent to the user when the Run Workflow Rules service job runs.

To assign a user to a result, single click the match that you wish to assign with the left mouse button to highlight and click the Assign button the on the Actions ribbon. The Assign dialog opens. Assignees can be selected in a number of ways, as described below.
Endpoint Owner: The Endpoint Owner is the user or users associated with the endpoint as manually specified in the Endpoint Details or defined in Active Directory. To select the endpoint owner(s) as the assignee, place a checkmark in the checkbox to the left of "Endpoint Owner:" by clicking on the checkbox.
Console Users and Roles: A result can also be assigned to a locally defined user or role. Console users are created in the Users page of the Admin tab. Console roles are created in the Roles page of the Admin tab. When you add a role as an assignee, all users assigned to that role becomes assignees for the rule. If a user synced from AD has been disabled, then it displays here in a gray italic font.
To add a Console user as an assignee:
- Select the checkbox to the left of "Console Users and Role:"
- Click on the Add User button and the Select Users window opens containing a list of the available Console users.
- Select the users you want to add as assignees and click the OK button. The Select Users window closes and the users that you selected display in the grid.
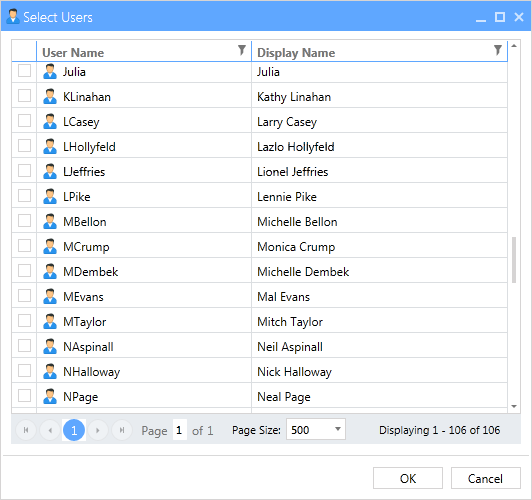
At the bottom of the select users dialog is a pager which displays when there are more than 100 users. Spirion Console has the ability to display large sets of data, however, it is not practical to display the entire user list in one view. The pager allows quick navigation between pages. Tabular data is displayed by splitting the users into pages, enabling the user to view large data sets by navigating forward and backward through the list of pages at the bottom of the grid.

The available elements of the pager are noted below:
 : Clicking the "First Page" button will return to the first page of users. This button will be disabled when viewing the first page.
 : Clicking the "Previous Page" button will step backward through the pages, one at a time. This button will be disabled when viewing the first page.
 : Clicking a specific page number will update the display to show the users on that page. The currently selected page number is highlighted in blue. A maximum of 9 page numbers will display at one time. If there are more than 9 pages of data, an ellipsis will be displayed. Clicking on the ellipsis to the right of the page numbers advances the results by 5 pages. Clicking on the ellipsis to the left will take you back 5 pages.
 : Clicking the "Next Page" button will step forward through the pages, one at a time. This button will be disabled when viewing the last page.
 : Clicking on the "Last Page" button will set the view to the last page of data. This button will be disabled when viewing the last page.
 : The "Page X of Y" control shows the page number of the currently viewed page. Typing a number in this field and pressing the enter key will update the view to display that page.
 : The "Page X of Y" control also shows the total number of pages of data.
 : The "Page Size" button allows you to select the number of rows that will display per page. The default is 500.
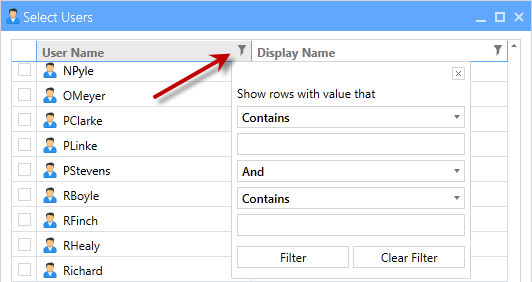
Filtering by column provides the ability to restrict the Users List to only display information that matches the specified, custom criteria. Multiple filters can be applied at once. To open the filter for any column, click on the filter icon on the column header. When a column is being filtered, the filter icon will appear filled.
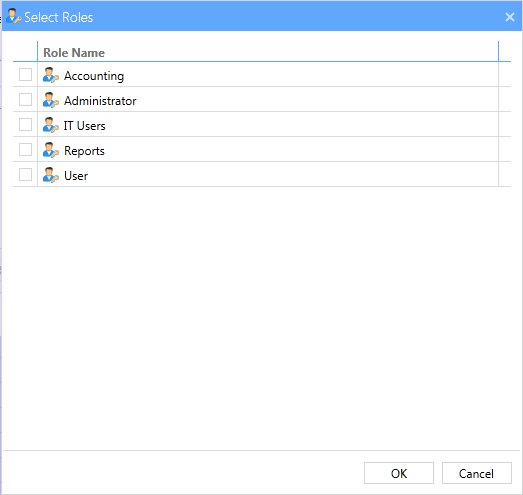
To add a Console role as an assignee:
- Select the checkbox to the left of "Console Users and Roles:"
- Click on the Add Role button and the Select Roles window opens containing a list of the available Console roles.
- Select the roles you want to add as assignees by placing a checkmark in the checkbox to the left of the User name and click the OK button. The Select Roles window closes and the roles that you selected display in the grid.
To remove a Console role as an assignee, select the role that you wish to remove by clicking on the Console role name and the Remove button is enabled. To select multiple roles, hold down the CTRL key while clicking on a role. Click on the Remove button and the selected role is removed from the grid.
At the bottom of the select roles dialog is a pager which displays when there are more than 100 roles. Spirion Console has the ability to display large sets of data, however, it is not practical to display the entire roles list in one view. The pager allows quick navigation between pages. Tabular data is displayed by splitting the roles into pages, enabling the user to view large data sets by navigating forward and backward through the list of pages at the bottom of the grid.
The available elements of the pager are noted below:
- : Clicking the "First Page" button will return to the first page of roles. This button will be disabled when viewing the first page.
- : Clicking the "Previous Page" button will step backward through the pages, one at a time. This button will be disabled when viewing the first page.
- : Clicking a specific page number will update the display to show the roles on that page. The currently selected page number is highlighted in blue. A maximum of 9 page numbers will display at one time. If there are more than 9 pages of data, an ellipsis will be displayed. Clicking on the ellipsis to the right of the page numbers advances the results by 5 pages. Clicking on the ellipsis to the left will take you back 5 pages.
- : Clicking the "Next Page" button will step forward through the pages, one at a time. This button will be disabled when viewing the last page.
- : Clicking on the "Last Page" button will set the view to the last page of data. This button will be disabled when viewing the last page.
- : The "Page X of Y" control shows the page number of the currently viewed page. Typing a number in this field and pressing the enter key will update the view to display that page.
- : The "Page X of Y" control also shows the total number of pages of data.
- : The "Page Size" button allows you to select the number of rows that will display per page. The default is 500.
To remove a Console user as an assignee, select the user that you wish to remove by clicking on the Console user name and the Remove button will become enabled. To select multiple users, hold the CTRL key while clicking on a user. Click on the Remove button and the select user will be removed from the grid.
After you add or remove an assignment you must either click the Finish button to save your changes or the Cancel button to discard your changes.
Note: Users cannot be unassigned from here. To unassign a user, click on the Details button located on the Results group of the ribbon and click on the red x to the left of the user name in the Assignments section of the Results Details dialog.