Assignments
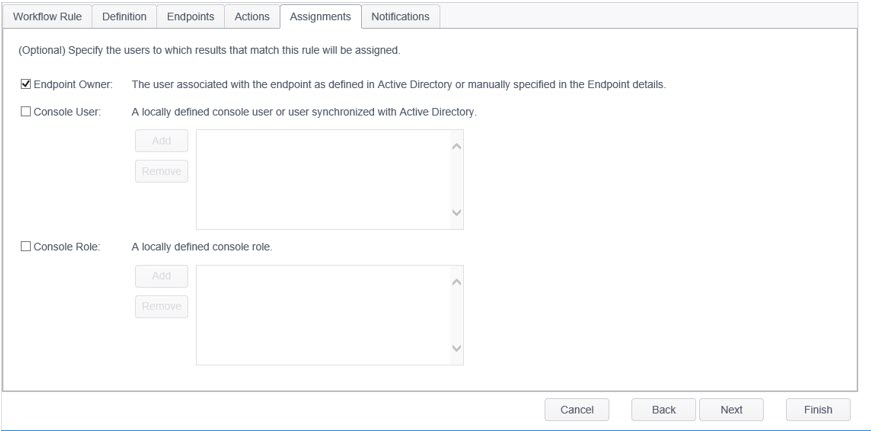
The Assignments tab allows you specify the users who will be assigned to the results which match the rule. A result can be assigned to multiple users or none at all. Assignment of users is optional. When a location has been assigned to a user, it will display in the Assignee column of the Results Grid. Assignment are made when the workflow rules are run. Changing an assignment after a rule has already been executed will only affect future results. Any results that have already had a assignment applied to them will not be updated with the new assignment.

Assignees can be selected in a number of ways, as described below:
| Field | Description |
|---|---|
| Endpoint Owner | The Endpoint Owner is the user or users associated with the endpoint as manually specified in the Endpoint Details or defined in Active Directory. To select the endpoint owner(s) as the assignee, place a checkmark in the checkbox to the left of "Endpoint Owner:" by clicking on the checkbox. |
| Console User | A result can also be assigned to a locally defined user. Console users are created in the Users page of the Admin tab. If a user synced from AD has been disabled, then it will display here in a gray italic font. |
| Console Role | A result can be assigned to a locally defined role. Console roles are created in the Roles page of the Admin tab. When you add a role as an assignee, all users assigned to that role will become assignees for the rule. |
Adding a Console User:
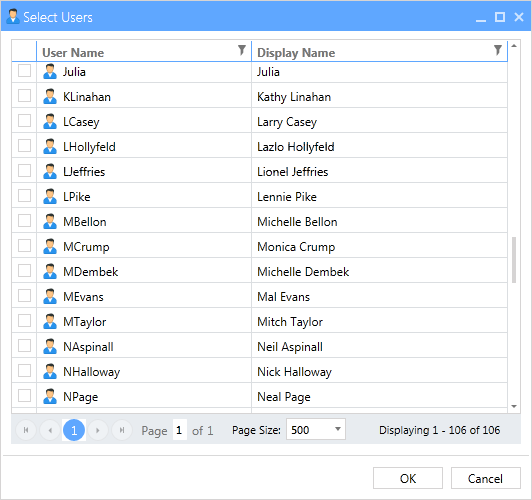
To add a Console user as an assignee, place a checkmark in the checkbox to the left of "Console User:" by clicking on the checkbox and the Add button will become enabled. Click on the Add button and the Select Users window will open containing a list of the available Console users . Select the users you want to add as assignees by placing a checkmark in the checkbox to the left of the user name and click the OK button. The Select Users window will close and the users that you selected display in the grid.

At the bottom of the select users dialog is a pager which displays when there are more than 100 users. Spirion Console has the ability to display large sets of data, however, it is not practical to display the entire user list in one view. The pager allows quick navigation between pages. Tabular data is displayed by splitting the users into pages, enabling the user to view large data sets by navigating forward and backward through the list of pages at the bottom of the grid.

The available elements of the pager are noted below:
-
 : Clicking the "First Page" button will return to the first page of users. This button will be disabled when viewing the first page.
 -
 : Clicking the "Previous Page" button will step backward through the pages, one at a time. This button will be disabled when viewing the first page.
 -
 : Clicking a specific page number will update the display to show the users on that page. The currently selected page number is highlighted in blue. A maximum of 9 page numbers will display at one time. If there are more than 9 pages of data, an ellipsis will be displayed. Clicking on the ellipsis to the right of the page numbers advances the results by 5 pages. Clicking on the ellipsis to the left will take you back 5 pages.
 -
 : Clicking the "Next Page" button will step forward through the pages, one at a time. This button will be disabled when viewing the last page.
 -
 : Clicking on the "Last Page" button will set the view to the last page of data. This button will be disabled when viewing the last page.
 -
 : The "Page X of Y" control shows the page number of the currently viewed page. Typing a number in this field and pressing the enter key will update the view to display that page.
 -
 : The "Page X of Y" control also shows the total number of pages of data.
 -
 : The "Page Size" button allows you to select the number of rows that will display per page. The default is 500.
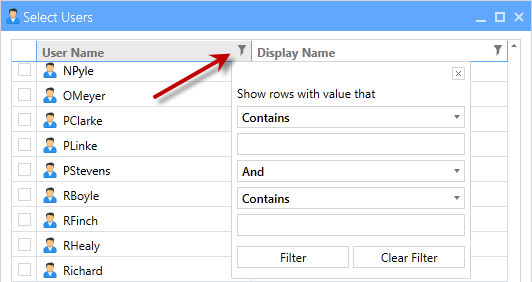
Filtering by column provides the ability to restrict the Users List to only display information that matches the specified, custom criteria. Multiple filters can be applied at once. To open the filter for any column, click on the filter icon on the column header. When a column is being filtered, the filter icon will appear filled.

To remove a Console user as an assignee, select the user that you wish to remove by clicking on the Console user name and the Remove button will become enabled. To select multiple users, hold the CTRL key while clicking on a user. Click on the Remove button and the selected user will be removed from the grid.
Adding a Console Role:
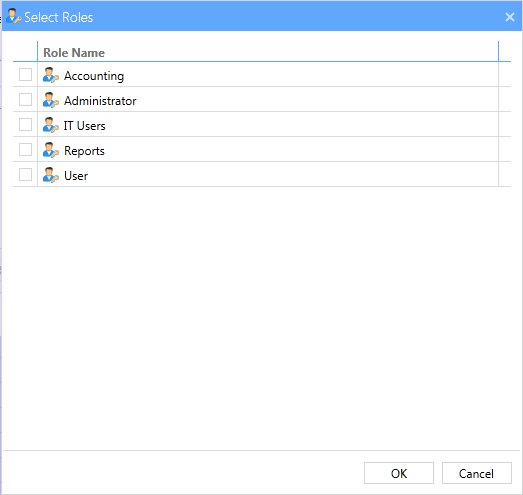
To add a Console role as an assignee, place a checkmark in the checkbox to the left of "Console Role:" by clicking on the checkbox and the Add button will become enabled. Click on the Add button and the Select Roles window will open containing a list of the available Console roles. Select the roles you want to add as assignees by placing a checkmark in the checkbox to the left of the User name and click the OK button. The Select Roles window will close and the roles that you selected will be display in the grid.
To remove a Console role as an assignee, select the role that you wish to remove by clicking on the Console role name and the Remove button will become enabled. To select multiple roles, hold down the CTRL key while clicking on a role. Click on the Remove button and the selected role will be removed from the grid.

At the bottom of the select roles dialog is a pager which displays when there are more than 100 roles. Spirion Console has the ability to display large sets of data, however, it is not practical to display the entire roles list in one view. The pager allows quick navigation between pages. Tabular data is displayed by splitting the roles into pages, enabling the user to view large data sets by navigating forward and backward through the list of pages at the bottom of the grid.

The available elements of the pager are noted below:
-
 : Clicking the "First Page" button will return to the first page of roles. This button will be disabled when viewing the first page.
 -
 : Clicking the "Previous Page" button will step backward through the pages, one at a time. This button will be disabled when viewing the first page.
 -
 : Clicking a specific page number will update the display to show the roles on that page. The currently selected page number is highlighted in blue. A maximum of 9 page numbers will display at one time. If there are more than 9 pages of data, an ellipsis will be displayed. Clicking on the ellipsis to the right of the page numbers advances the results by 5 pages. Clicking on the ellipsis to the left will take you back 5 pages.
 -
 : Clicking the "Next Page" button will step forward through the pages, one at a time. This button will be disabled when viewing the last page.
 -
 : Clicking on the "Last Page" button will set the view to the last page of data. This button will be disabled when viewing the last page.
 -
 : The "Page X of Y" control shows the page number of the currently viewed page. Typing a number in this field and pressing the enter key will update the view to display that page.
 -
 : The "Page X of Y" control also shows the total number of pages of data.
 -
 : The "Page Size" button allows you to select the number of rows that will display per page. The default is 500.
To remove a Console user as an assignee, select the user that you wish to remove by clicking on the Console user name and the Remove button will become enabled. To select multiple users, hold the CTRL key while clicking on a user. Click on the Remove button and the select user will be removed from the grid.
After you add or remove an assignment you must either click the Finish button to save your changes or Cancel button to discard your changes. If you try to select another classification or rule without clicking the Finish or Cancel button, you are prompted with a confirmation dialog that reads, "Do you want to save the current rule?" Select Yes to save your changes, No to discard them or Cancel to return to the rule.