Database Settings
The Database Settings tab displays settings and maintenance operations for the database.
 How do I launch the Console Administrator Tool (CAT)?
The Database Settings tab has the following options:
| Field | Description |
|---|---|
| Database Server Name | This is the server and, if applicable, SQL instance name string entered in the format of <SERVER>[,PORT]\<INSTANCENAME>. The initial value is populated based on the Database Server Name used during the installation process. The [,PORT] (comma then port number) is an optional argument that is only used when SQL is located on a remote server and is configured only to respond on a specific TCP port. For most systems, only the server name (fully qualified DNS name, NETBIOS name, computer name or IP address) followed by a backslash and then the SQL Instance name, configured when SQL Server was installed or the specific instance was created, are necessary. |
| Database Name | The name of the database. The default of IdfMC is appropriate for most configurations, but any valid database name may be specified. |
| Authentication | There are two authentication types available, "Windows Authentication" and "SQL Server Authentication". The "Windows Authentication" method attempts to connect to the database as the user who is running the IIS application pool (by default the Network Service account). If the database is on a remote server, the IIS application pool still runs as Network Service, but the user principal presented to the remote database server is DOMAIN\SERVERNAME$, where DOMAIN is the short name of the domain and SERVERNAME is the name of the server where Console is installed. The "SQL Server Account" method allows users to enter a "Username" and "Password" in the subsequent fields to utilize SQL Authentication. |
| User Name | The user name for SQL Server Authentication. |
| Password | The password for the user for SQL Server Authentication. |
| Encrypt Connection | If enabled, SSL is used when authenticating to the database. You need to have a self-signed certificate on your server and SQL Server must be configured to use SSL. |
| Enable Read Committed Snapshot | When this option is enabled, the Spirion Server Service should experience less locking although some operations may take longer to complete. When enabling or disabling this option, you are prompted whether you wish to change the default data read transaction isolation level of certain data read operations (such as results/logs grids, endpoints lists, reports, etc.). It is generally recommended to answer Yes, but it is not mandatory. It is also recommended to enable this option if a user does not observe a significant performance degradation afterward. The default value is disabled. |
| Command Timeout | The number of seconds before a database operation times out when executed by the Console web application, the Services web application, or the Spirion Server Service. The default is 300. |
| Command Timeout in CAT | The number of seconds before a database operation times out when executed from within the CAT. The primary purpose of this settings is to increase the length of time available to the Rebuild Indexes in the Database operation before it times out. The default value is 3600. |
| Command Batch Size | If purge jobs are taking a long time, you may increase the value of the Command Batch Size. If there are deadlocks or timeouts occurring during purge jobs, then you may decrease the value of the Command Batch Size. The default value is 1500. |
| Connections Pool Size | This is the number of concurrent connections that are allowed to the database per application, which means the Console Application, Services Web Application and Server Service (each described on the Web Application Settings tab) each have their own connection pool of the defined size. The default value is 100. For the Console, this means the number of users that can concurrently do something in the Console that requires access to the database. For Services and Server Service, this means the maximum number of Agents contacting the Console, whether it is uploading of data, endpoint registration, policies requesting, results queries, etc. If the Connection Pool Size is set too low (i.e., below the value in Maximum Concurrent Agents on the Web Applications Settings tab), it may happen that the Agents start getting exceptions due to the pool being exhausted instead of getting a retry code when the Maximum Concurrent Agents limit is reached. Therefore, the Connection Pool Size setting should be greater than the Maximum Concurrent Agents setting by at least 10. Increasing this number may decrease the overall performance, but may help to alleviate deadlocks. This does not control the number of endpoints that can simultaneously connect to the Console, which is controlled by the Maximum Concurrent Agents setting on the Web Application Settings tab. |
| Version | Displays the current version of the installed database. |
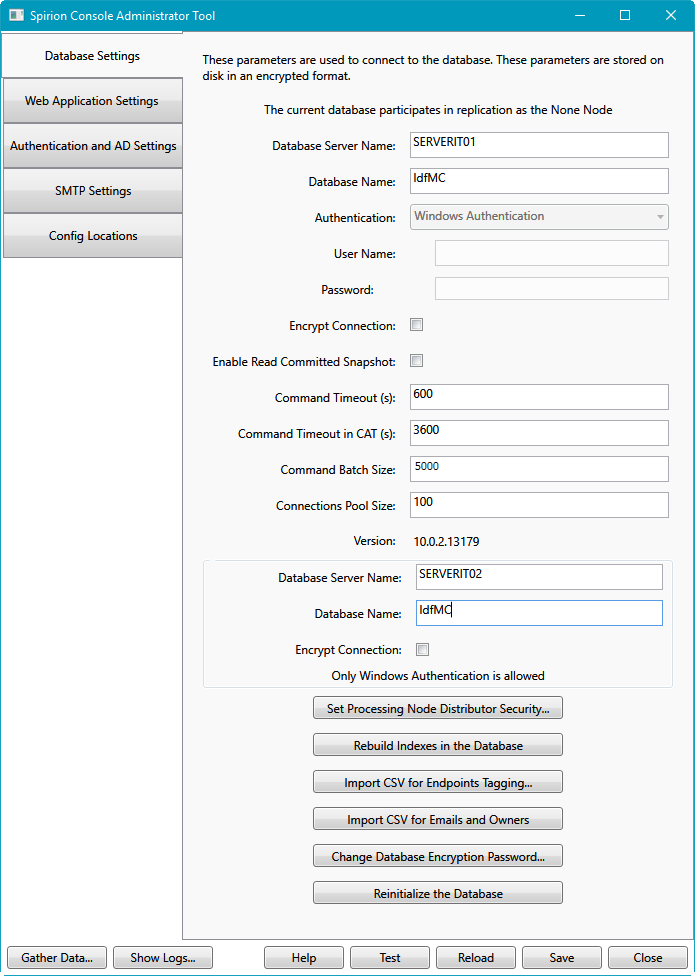
The Database Settings tab has the following options for the Remote Node Connection: (Note: The Remote Node Connection settings only displays if you chose to replicate your database prior to installation of the Console.) When you use replication there is a Data node and a Processing node and each node needs to be able to access the other node's database. To set that up, you need to provide credentials for connecting to the database. When you are on the Processing node, these fields are used to connect to the Data node's database. When you are on the Data node, these fields are used to connect to the Processing node's database.
| Field | Description |
|---|---|
| Database Server Name | This is the Remote node (Processing node if you are on the Data node and Data node if you are on the Processing node) server and, if applicable, SQL instance name string entered in the format of <SERVER>[,PORT]\<INSTANCENAME>. The initial value is populated based on the Database Server Name used during the installation process. The [,PORT] (comma then port number) is an optional argument that is only used when SQL is located on a remote server and is configured only to respond on a specific TCP port. For most systems, only the server name (fully qualified DNS name, NETBIOS name, computer name or IP address) followed by a backslash and then the SQL Instance name (configured when SQL Server was installed or the specific instance was created) are necessary. |
| Database Name | The name of the Remote Node database. The default of IdfMC is appropriate for most configurations, but any valid database name may be specified. |
| Encrypt Connection | If enabled, SSL is used when authenticating to the Processing Node database. You need to have a self-signed certificate on your server and SQL Server must be configured to use SSL. |
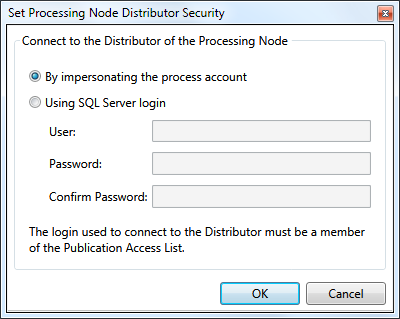
| Set Processing Node Distributor Security... |
This button opens a dialog where you can specify how to connect to the distributor of the processing node. The connection can be made by impersonating the Microsoft Windows account or under the context of a Microsoft SQL Server account that you specify. (Note: This button is only displayed if you chose to replicate your database prior to installation of the Console.)
Selecting By impersonating the process account connects to the processing node by impersonating the process account. The Microsoft Windows account is also referred to as the process account, because the agent process runs under this account. Selecting Using SQL Server login allows you to login to the processing node under the context of a Microsoft SQL Server account using your SQL server credentials. Enter your user name in the User field and your password in the Password and Confirm Password fields. |
| Rebuild Indexes in the Database | This button deletes all existing database indexes and builds new ones. Rebuilding indexes increases the performance of the database and should be performed periodically. Rebuilding of indexes can be automated using SQL Server management tools. To automate this process, contact a qualified Database Administrator (DBA). If the rebuild fails, increase the Command Timeout in CAT value and try again. |
| Import CSV for Endpoints Tagging... |
Use this button to import CSV (comma separated values) files to assign endpoints to existing tags or new tags. The CSV files can consist of comma separated value pairs in any of the following formats. When importing single tags:
When importing sub tags: Where "TAG" is the case sensitive name of an existing tag, "ENDPOINT NAME" is the case sensitive name of an existing endpoint, "MAC ADDRESS" is the upper case mac address of a network card assigned to an endpoint, and "IP ADDRESS" is any IPv4 address of a network card assigned to an endpoint. The CSV file must only contain the values specified above and may not contain any header rows or other information. The values in the file must not contain any leading or trailing quotes and there should not be a space between comma and tag name. |
| Import CSV for Emails and Owners |
Use this button to import CSV (comma separated values) files to assign an email address to a Console user, an email address to an endpoint and an owner to an endpoint. The CSV files can consist of comma separated values in any of the following 3 formats:
"AssignUserEmail" must appear exactly as shown above, where "USERNAME" is the name of a valid Console user and "EMAIL" is the email address to be assigned to the user. User emails can only be assigned when AD user authentication is disabled. If AD is enabled, "AssignUserEmail" lines in the import file are ignored. If multiple lines exist with the same user name but different email addresses, only the first email address is used. "AssignEndpointEmail" must appear exactly as shown above, where ENDPOINTNAME is the name of an existing endpoint in the Console and "EMAIL" is the email address to be assigned to the endpoint. If multiple lines exist with the same endpoint name but different email addresses, only the first email address is used. "AssignEndpointOwner" must appear exactly as shown above, where "ENDPOINTNAME" is the name of an existing endpoint in the Console and "ENDPOINTOWNER" is the name of a valid Console user. The CSV file must only contain the values specified above and may not contain any header rows or other information. The values in the file must not contain any leading or trailing quotes and there should not be a space between comma and tag name. Below is an example of a csv file that assigns the email "bob.smith@company.com" to user "bsmith ", the email "bob.smith@company.com" to endpoint "orchard" and user "bsmith" as the owner of endpoint "orchard". AssignUserEmail,bsmith,bob.smith@company.com AssignEndpointEmail,orchard,bob.smith@company.com AssignEndpointOwner,orchard,bsmith |
| Change Database Encryption Password... | Use this button to reset the database encryption password configured during the initial Console installation or to recover data that may have been encrypted with multiple, different passwords.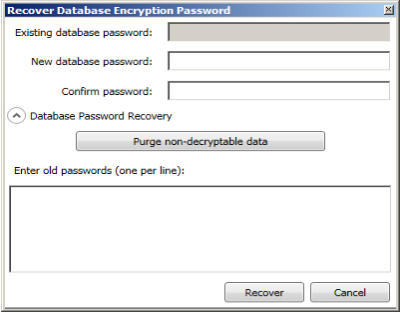 Enter your current encryption password in the Existing database password field. In the New database password and Confirm password fields, enter the new encryption password. If Database Password Recovery is required, enter all old passwords, one per line. Also, enter the password secret, which may be necessary in cases where the installation process fails prematurely. When ready, click the Recover button. The duration of the recovery process depends on the amount of encrypted data and may take from anywhere from a few minutes to several hours. The recovery process must not be interrupted; doing so will likely cause data loss. If data recovery is not desired, click the Purge non-decryptable data button to purge all data that cannot be decrypted by the current password. |
| Reinitialize the Database | Pressing this button reinitializes the Console database and, if necessary, recreates basic data such as administrator role, administrator user, and administrator permissions as well as clearing any invalid permissions that may exist. If you are logged into the Console as an administrator but are unable to perform certain actions that the administrator should be able to perform or there are buttons that are missing or disabled, then this is when you would want to reinitialize the database. After pressing this button it is necessary to access the Console by logging in or, if already logged in, manually refreshing the Console in the browser by using the refresh button in order to complete the re-initialization. |
The common buttons at the bottom of the CAT can be used as follows on the Database Settings page:
| Field | Description |
|---|---|
| Help | Use this button to open a browser window with context sensitive help. |
| Test | Use this button to test the database connection settings. Any connection issues results in an error that is displayed. |
| Reload | Use this button to reload the IIS configuration with the updated database settings. |
| Save | Use this button to save configuration changes made to database settings. This button should be pressed once all desired changes are complete and before the Test button is used. After the Save button is pressed, a confirmation dialog displays that reads, "The settings were saved successfully." |
| Close | Use his button to close the CAT. Before clicking the Close button, make sure that you have saved any desired changes by clicking the Save button or the changes are lost. |