Endpoint Updates View
|
In this article |
Windows Endpoint Updates
The Windows Endpoint Updates tab is used to deploy updates for the Windows Agent software on endpoints. Only a valid, customized MSI can be used with this feature. To create a customized MSI, follow the instructions detailed in the Knowledge Base article: Creating a Custom Installer for Windows (MSI)
Once the MSI is created it may be uploaded to the Console server or posted on a separate web server.
You can create multiple updates and apply each one to a different tag in the event that you do not wish to update all of your endpoints at the same time. This provides you with the flexibility to roll out the updates in stages. To create a new Windows Endpoint update click the Add button on the Endpoint Updates Ribbon.
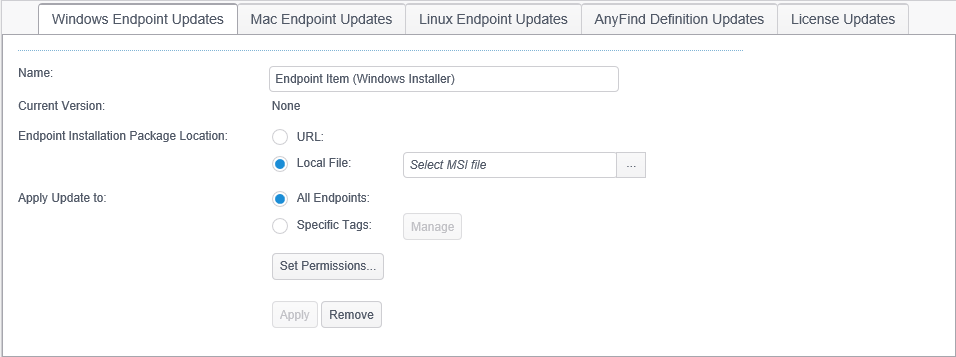
The following fields and settings are available:
- Name: Specify the name for the client update. This is the name that will display in the Policy Name column of the Policies tab on the Endpoint Status Detail.
- Current Version (or Upload Date): This displays the version information read from the specified location. Licenses do not contain version information so when Licenses are uploaded the Upload Date is associated with the exact date/time of the upload. When no files or URL's are defined this field will display None, otherwise the appropriate version or date/time information will be displayed.
- Endpoint Installation Package Location: This field is used to either upload a file or indicate a URL for a web server that all endpoints can access to download the file. In either case the specified file will be processed, and once verified endpoints will receive instructions to update the file. The following locations are available:
- URL: A specific URL that points to a location on a web server that all endpoints can access. This URL will be used by endpoints to download the specified file, instead of having the file distributed by the Console server itself. This option is useful if an existing distribution server is used for deploying applications, or if many endpoints exist and the bandwidth/load of distributing files causes issues with the responsiveness of the Console server.
- Local File: Use the "..." button to select a target file from the current workstation that will be uploaded to the Console server. When this option is used the Console server keeps the uploaded file and distributes it to each endpoint as necessary.
- Apply Update to: Specifies the group of endpoints to apply the update to. The following options are available:
- All Endpoints: Select this option to apply the update to all endpoints.
- Specified Tags: Select this option to apply the update only to specified tags.
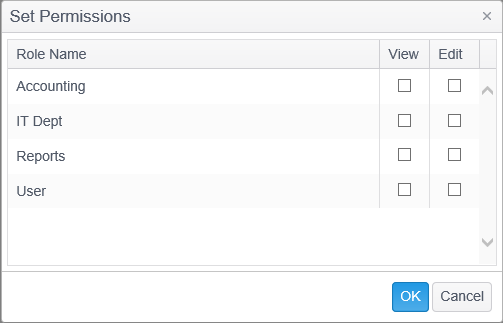
- Set Permissions: You can set the permissions for an update so that only users belonging to the specified roles can view and edit the update. If you do not specify the permissions only users with the Administrator permission will be able to view and edit the update. Users with the Administrator permission will always be able to view and edit an update regardless of which roles are specified. The following permissions are available:
- View: Users within the role will be able to view the update.
- Edit: Users within the role will be able to view the update and make changes to it. If you assign the Edit permission, the View permission will also be assigned. If you remove the view permission the Edit permission will also be removed.
Updates can only be applied to tags, they cannot be applied to individual endpoints.
Click the Apply button to apply the updates. Click the Remove button to cancel the update.
Any endpoints that are updated before the update is removed will not revert back to their previous version.
Mac Endpoint Updates
The Mac Endpoint Updates tab is used to deploy updates for the Mac Agent software on endpoints. Only a valid, customized and zipped Mac package can be used with this feature. To create a customized Mac package, follow the instructions detailed in the Knowledge Base article: Creating a Custom Installer for Mac (PackageMaker Package)
Once the package is created, it must be zipped before it can be uploaded to the Console server or posted on a separate web server.
You can create multiple updates and apply each one to a different tag in the event that you do not wish to update all of your endpoints at the same time. This provides you with the flexibility to roll out the updates in stages. To create a new Mac Endpoint update click the Add button on the Endpoint Updates Ribbon.
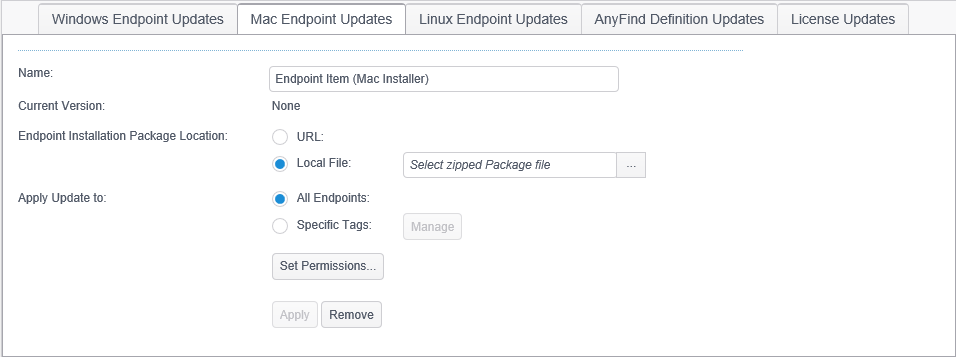
The following fields and settings are available:
- Name: Specify the name for the client update. This is the name that will display in the Policy Name column of the Policies tab on the Endpoint Status Detail.
- Current Version (or Upload Date): This displays the version information read from the specified location. Licenses do not contain version information so when Licenses are uploaded the Upload Date is associated with the exact date/time of the upload. When no files or URL's are defined this field will display None, otherwise the appropriate version or date/time information will be displayed.
- Endpoint Installation Package Location: This field is used to either upload a file or indicate a URL for a web server that all endpoints can access to download the file. In either case the specified file will be processed, and once verified endpoints will receive instructions to update the file. The following locations are available:
- URL: A specific URL that points to a location on a web server that all endpoints can access. This URL will be used by endpoints to download the specified file, instead of having the file distributed by the Console server itself. This option is useful if an existing distribution server is used for deploying applications, or if many endpoints exist and the bandwidth/load of distributing files causes issues with the responsiveness of the Console server.
- Local File: Use the "..." button to select a target file from the current workstation that will be uploaded to the Console server. When this option is used the Console server keeps the uploaded file and distributes it to each endpoint as necessary.
- Apply Update to: Specifies the group of endpoints to apply the update to. The following options are available:
- All Endpoints: Select this option to apply the update to all endpoints.
- Specified Tags: Select this option to apply the update only to specified tags.
- Set Permissions: You can set the permissions for an update so that only users belonging to the specified roles can view and edit the update. If you do not specify the permissions only users with the Administrator permission will be able to view and edit the update. Users with the Administrator permission will always be able to view and edit an update regardless of which roles are specified. The following permissions are available:
- View: Users within the role will be able to view the update.
- Edit: Users within the role will be able to view the update and make changes to it. If you assign the Edit permission, the View permission will also be assigned. If you remove the view permission the Edit permission will also be removed.

Updates can only be applied to tags, they cannot be applied to individual endpoints.
Click the Apply button to apply the updates. Click the Remove button to cancel the update.
Any endpoints that are updated before the update is removed will not revert back to their previous version.
Linux Endpoint Updates
The Linux Endpoint Updates tab is used to deploy updates for the Linux Agent software on endpoints. Only a valid, customized and tar/gzipped Linux package can be used with this feature. To create a customized Linux package, follow the instructions detailed in the Knowledge Base article:Creating a Custom Installer for Linux.
You can create multiple updates and apply each one to a different tag in the event that you do not wish to update all of your endpoints at the same time. This provides you with the flexibility to roll out the updates in stages. To create a new Linux Endpoint update click the Add button on the Endpoint Updates Ribbon.
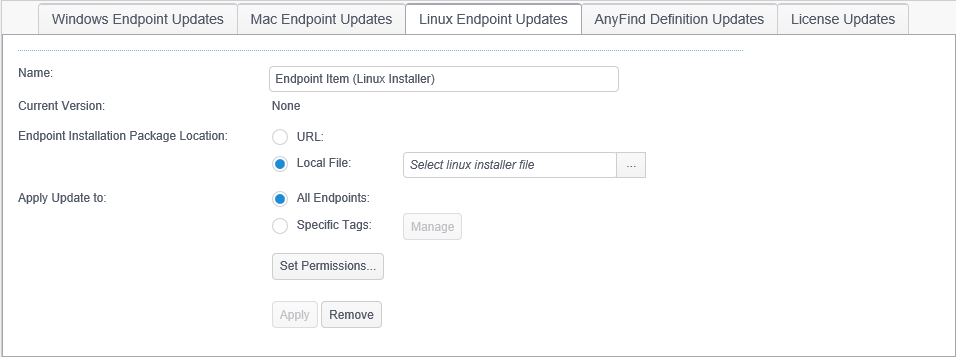
The following fields and settings are available:
- Name: Specify the name for the client update. This is the name that will display in the Policy Name column of the Policies tab on the Endpoint Status Detail.
- Current Version (or Upload Date): This displays the version information read from the specified location. Licenses do not contain version information so when Licenses are uploaded the Upload Date is associated with the exact date/time of the upload. When no files or URL's are defined this field will display None, otherwise the appropriate version or date/time information will be displayed.
- Endpoint Installation Package Location: This field is used to either upload a file or indicate a URL for a web server that all endpoints can access to download the file. In either case the specified file will be processed, and once verified endpoints will receive instructions to update the file. The following locations are available:
- URL: A specific URL that points to a location on a web server that all endpoints can access. This URL will be used by endpoints to download the specified file, instead of having the file distributed by the Console server itself. This option is useful if an existing distribution server is used for deploying applications, or if many endpoints exist and the bandwidth/load of distributing files causes issues with the responsiveness of the Console server.
- Local File: Use the "..." button to select a target file from the current workstation that will be uploaded to the Console server. When this option is used the Console server keeps the uploaded file and distributes it to each endpoint as necessary.
- Apply Update to: Specifies the group of endpoints to apply the update to. The following options are available:
- All Endpoints: Select this option to apply the update to all endpoints.
- Specified Tags: Select this option to apply the update only to specified tags.
- Set Permissions: You can set the permissions for an update so that only users belonging to the specified roles can view and edit the update. If you do not specify the permissions only users with the Administrator permission will be able to view and edit the update. Users with the Administrator permission will always be able to view and edit an update regardless of which roles are specified. The following permissions are available:
- View: Users within the role will be able to view the update.
- Edit: Users within the role will be able to view the update and make changes to it. If you assign the Edit permission, the View permission will also be assigned. If you remove the view permission the Edit permission will also be removed.

Updates can only be applied to tags, they cannot be applied to individual endpoints.
Click the Apply button to apply the updates. Click the Remove button to cancel the update.
Any endpoints that are updated before the update is removed will not revert back to their previous version.
AnyFind Definitions Updates
The AnyFind Definitions Updates tab is used to deploy updates for the AnyFind definitions to endpoints. To use this feature, download the AnyFind definitions from the Spirion web site and place them on the Console server or on another web server. The definitions can be downloaded here:
Spirion AnyFind Definitions Download
The file to be uploaded can be the zip file available at the link above or just the definitions file (identitydb.dat) itself.
You can create multiple updates and apply each one to a different tag in the event that you do not wish to update all of your endpoints at the same time. This provides you with the flexibility to roll out the updates in stages. To create a new AnyFind Definition update click the Add button on the Endpoint Updates Ribbon.
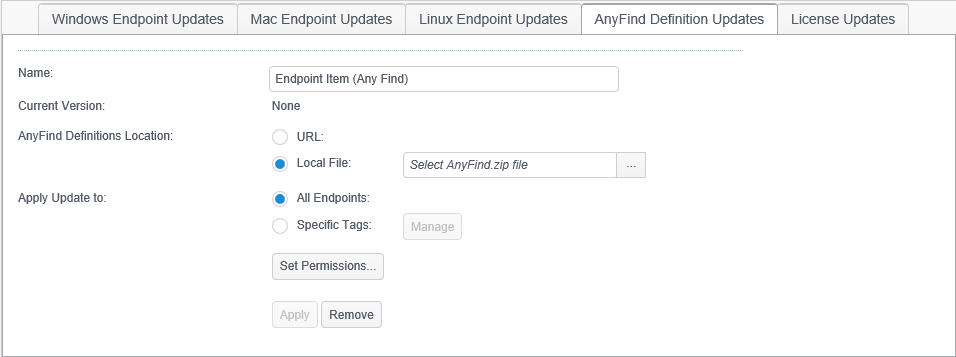
The following fields and settings are available:
- Name: Specify the name for the client update. This is the name that will display in the Policy Name column of the Policies tab on the Endpoint Status Detail.
- Current Version (or Upload Date): This displays the version information read from the specified location. Licenses do not contain version information so when Licenses are uploaded the Upload Date is associated with the exact date/time of the upload. When no files or URL's are defined this field will display None, otherwise the appropriate version or date/time information will be displayed.
- Endpoint Installation Package Location: This field is used to either upload a file or indicate a URL for a web server that all endpoints can access to download the file. In either case the specified file will be processed, and once verified endpoints will receive instructions to update the file. The following locations are available:
- URL: A specific URL that points to a location on a web server that all endpoints can access. This URL will be used by endpoints to download the specified file, instead of having the file distributed by the Console server itself. This option is useful if an existing distribution server is used for deploying applications, or if many endpoints exist and the bandwidth/load of distributing files causes issues with the responsiveness of the Console server.
- Local File: Use the "..." button to select a target file from the current workstation that will be uploaded to the Console server. When this option is used the Console server keeps the uploaded file and distributes it to each endpoint as necessary.
- Apply Update to: Specifies the group of endpoints to apply the update to. The following options are available:
- All Endpoints: Select this option to apply the update to all endpoints.
- Specified Tags: Select this option to apply the update only to specified tags.
- Set Permissions: You can set the permissions for an update so that only users belonging to the specified roles can view and edit the update. If you do not specify the permissions only users with the Administrator permission will be able to view and edit the update. Users with the Administrator permission will always be able to view and edit an update regardless of which roles are specified. The following permissions are available:
- View: Users within the role will be able to view the update.
- Edit: Users within the role will be able to view the update and make changes to it. If you assign the Edit permission, the View permission will also be assigned. If you remove the view permission the Edit permission will also be removed.

Updates can only be applied to tags, they cannot be applied to individual endpoints.
Click the Apply button to apply the updates. Click the Remove button to cancel the update.
Any endpoints that are updated before the update is removed will not revert back to their previous version.
License Updates
The License Updates tab is used to deploy license files to endpoints. This functionality is used to update license information independently of updating the Agent software, For example, if new license functionality were purchased such as Database, Web or Exchange Server searching,or a subscription license was renewed, the license files with the updated information can be easily distributed.
To obtain a valid copy of the license file, please contact the internal purchasing department that received the license at time of purchase or at time of upgrade or extension of an existing contract. Alternatively, contact the Spirion Account Representative for a new license or any further license related questions. If the account representative is not known, contact the sales team:
Contact Sales
This feature is not compatible with Activation Numbers.
You can create multiple updates and apply each one to a different tag in the event that you do not wish to update all of your endpoints at the same time. This provides you with the flexibility to roll out the updates in stages. To create a new License Agent update click the Add button on the Agent Updates Ribbon.
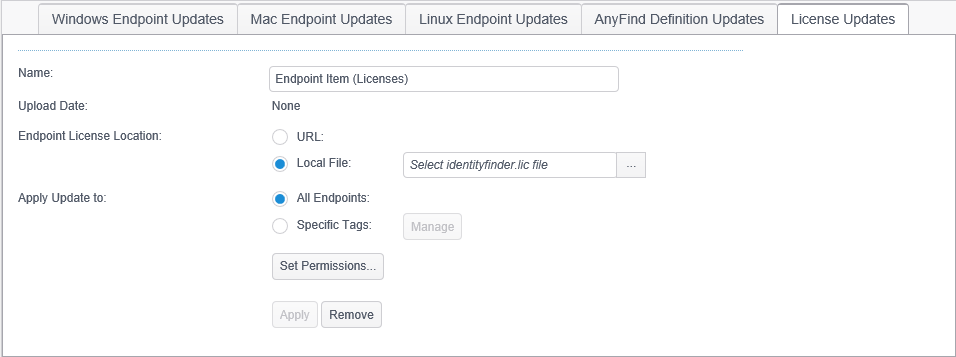
The following fields and settings are available:
- Name: Specify the name for the client update. This is the name that will display in the Policy Name column of the Policies tab on the Endpoint Status Detail.
- Current Version (or Upload Date): This displays the version information read from the specified location. Licenses do not contain version information so when Licenses are uploaded the Upload Date is associated with the exact date/time of the upload. When no files or URL's are defined this field will display None, otherwise the appropriate version or date/time information will be displayed.
- Endpoint Installation Package Location: This field is used to either upload a file or indicate a URL for a web server that all endpoints can access to download the file. In either case the specified file will be processed, and once verified endpoints will receive instructions to update the file. The following locations are available:
- URL: A specific URL that points to a location on a web server that all endpoints can access. This URL will be used by endpoints to download the specified file, instead of having the file distributed by the Console server itself. This option is useful if an existing distribution server is used for deploying applications, or if many endpoints exist and the bandwidth/load of distributing files causes issues with the responsiveness of the Console server.
- Local File: Use the "..." button to select a target file from the current workstation that will be uploaded to the Console server. When this option is used the Console server keeps the uploaded file and distributes it to each endpoint as necessary.
- Apply Update to: Specifies the group of endpoints to apply the update to. The following options are available:
- All Endpoints: Select this option to apply the update to all endpoints.
- Specified Tags: Select this option to apply the update only to specified tags.
- Set Permissions: You can set the permissions for an update so that only users belonging to the specified roles can view and edit the update. If you do not specify the permissions only users with the Administrator permission will be able to view and edit the update. Users with the Administrator permission will always be able to view and edit an update regardless of which roles are specified. The following permissions are available:
- View: Users within the role will be able to view the update.
- Edit: Users within the role will be able to view the update and make changes to it. If you assign the Edit permission, the View permission will also be assigned. If you remove the view permission the Edit permission will also be removed.

Updates can only be applied to tags, they cannot be applied to individual endpoints.
Click the Apply button to apply the updates. Click the Remove button to cancel the update.
Any endpoints that are updated before the update is removed will not revert back to their previous version.
Missing Endpoint uploads
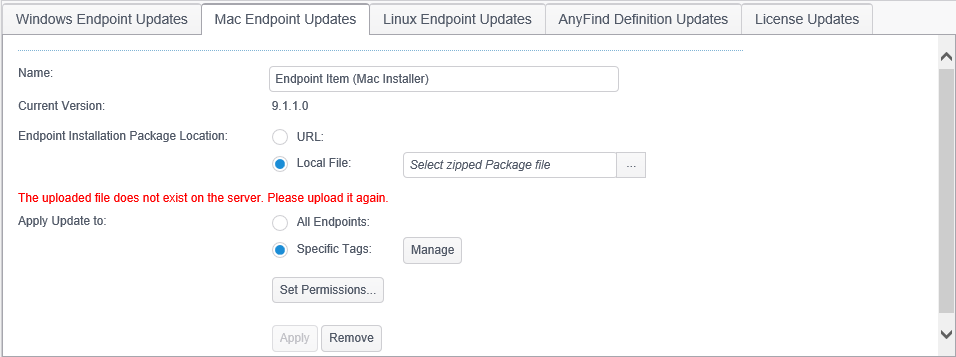
When you click the Apply button to apply an update, the file is uploaded to the server for deployment. If the file has been removed from the server after it has been applied the following message displays at the top of the Console the next time you log in.

To see which endpoint upload is missing, click on the tabs and any endpoint updates that are missing displays the following message.
Modifying an update
It is recommended that once an update has been applied that you do not modify it. If you need to change which endpoints or tags it is applied to or you need to upload a different file, you should instead delete the existing update and add a new one.