Search Locations
The Search Locations section allows you to define specific locations for the search.
While the settings allow you to enable the folder search and specify that you would like custom folders, the actual list of custom folders is specified in the Search Locations. The same is true for Remote Machines, Database, and Web Sites.
Additionally, the Search Locations contain any custom types, that define specific information to be included in the search.
|
In this article |
Custom Folders
Custom Folders allow you to specify folders to include or exclude during a search. When including a folder, all of its sub-folders are also included unless specifically excluded. When excluding a folder, all of its sub-folders are excluded unless specifically included.

To add a new folder, click the Add button in the Custom Folders group. Alternatively, you may right click anywhere under the Folder Location list and select Add. After a new row is added to the list, enter the full path of the folder in the Folder Location field. For example, C:\data\documents for Windows or /data/documents for Mac. The path is included in the policy exactly as it is entered. If a policy is applied to both Windows and Mac endpoints, each system receives the full set of paths. While this is benign because the paths would not exist on the different platforms, you will see errors in the Agent log that the non-relevant paths could not be found. In addition to full file paths, you may also enter UNC paths, such as \\10.0.0.1\c$. Finally, you may also use environment variables appropriate for each system such as %USERPROFILE%\Desktop (Windows) or $HOME/Desktop (Mac OS).
Be careful when specifying UNC paths in a policy. As with all Custom Folders in a policy, the UNC path is included by all endpoints associated with the policy. This causes every endpoint in the policy to search the UNC path.
In the Scope drop-down field, select one of the following:
- Include in Search to have all of the endpoints assigned to the policy search the specified folder and all of its sub-folders.
- Exclude from Search to prevent all of the endpoints assigned to the policy from searching the folder and all of its sub-folders.
The Custom Folders also supports the use of a wildcard (*) for a folder path when specifying folders to include or exclude from the search.
If c:\users were added as a folder to include and it was desirable to exclude all the appdata folders under each user, you can add c:\users\*\appdata as a folder to exclude from the search. At the start of the search, all of the subfolders under c:\users are enumerated and each one with an appdata folder has that appdata folder path added to the list of folders to exclude. Therefore, c:\users\user1\appdata and all folders under that would not be searched while c:\users\user1\desktop would searched.
Note: The * needs to be in the path, not at the end. If the * is the trailing character in a path it does not work.
You may also add a bare folder name in the custom folder list as an exclusion. Whenever that folder name is encountered, it is skipped as if the full path were in the list. For example, if you add help as an exclusion, the folders c:\help, c:\windows\help, d:\customapp\documentation\help and all of the folders beneath those folders are not searched. Bare folder names can only be used as an exclusion and cannot be used to specify folders to include in the search.
To edit a folder, highlight the folder to be edited and click the Edit ribbon button in the Custom Folders group. Alternatively, you may right click on a folder location and select Edit.
To remove a folder, highlight the folder to be removed and click on the Remove ribbon button in the Custom Folders group. Alternatively, you may right click on a folder location and select Remove. A confirmation dialog will display confirming "The selected row will be permanently deleted. Would you like to delete this row?".
Note: Custom Folder locations will be honored regardless of the value of the \Settings\Locations\FileLocations policy setting.
Remote Machines
This feature is not available for the Mac OS Agent, though it is possible to specify remote locations for the Mac platform via the Custom Folders list (additional licensing is required). Specifying Remote Machines in a policy applied to Mac OS endpoints has no effect.
The Remote Machines list provides two facilities:
- To specify a remote system that the Agent should attach to and search all of the drives (or shares) on that system.
- To specify credentials to be used when connecting to UNC paths specified in the Custom Folder list.

To add a remote machine, click the Add ribbon button in the Remote Machines group. Alternatively, you may right click anywhere in the remote machines list and select Add.
Be careful when specifying Remote Machines in a policy. All addresses included in a policy are searched by all endpoints associated with the policy.
The Policy View displays the following columns when Remote Machines is selected:
| Field | Description |
|---|---|
| Order | The 0-based order in which the specified addresses will be searched. The addresses will be searched sequentially/serially and it may be desirable to search certain systems before others. To change the order, highlight a row and click the Move Up or Move Down ribbon buttons in the Remote Machines group. Alternatively, you can right click on the row and select Move Up or Move Down. |
| Address | The system name to search (examples are shown for each valid type in the Type column). The Agent will connect to the address exactly as provided. |
| Type |
The type of address specified in the Address column. The valid types and examples are:
|
| Mode |
Specifies how the Agent should use this address, one of the following:
|
| Username | The username to use when authenticating to the remote systems when the Mode is Auth and Search or Auth Only. |
| Password | The password to use when authenticating to the remote systems when the Mode is Auth and Search or Auth Only. |
There are a number of settings relevant to searching Remote Machines such as whether to authenticate to the specified machines before the search or during the search as each machine is completed and the next one is ready to be searched and whether to search via administrative shares (c$, d$, etc) or to also search non-administrative shares (for example when searching non-Windows systems.) These settings are located under the category Settings\Locations\Remote in the Settings section of the policy.
To edit a remote machine, highlight the row to be edited and click the Edit ribbon button in the Remote Machines group. Alternatively, you may right click on a row and select Edit.
To remove a remote machine, highlight the row to be removed and click on the Remove ribbon button in the Remote Machines group. Alternatively, you may right click on a row and select Remove. A confirmation dialog displays confirming "The selected row will be permanently deleted. Would you like to delete this row?".
Databases
This feature requires the Database Search module and is not available for the Mac OS or Linux Agent. Specifying database connection strings in a policy applied to Mac OS and Linux endpoints will have no effect.
Agents can search relational and NoSQL databases using a properly formatted connection string (including credentials, if necessary). The connection string can be provided by a database administrator and/or can be created by using the Agent software on a Windows machine. More information on creating connection strings is available in the Windows Agent user guide. Connection strings are unique to each environment and database configuration and therefore the Spirion Support Team cannot assist with their creation.
The endpoints associated with the policy must have the appropriate provider installed.

Add a Database Connection String
To add a database connection string:
- Click the Add ribbon button in the Databases group, or right-click anywhere in the database list and select Add.
Be careful when specifying databases in a policy. All connection strings included in a policy will be searched by all endpoints associated with the policy. The password is masked when viewing the connection string in the Console if the password is entered in the following format Password=mypassword; replacing the password with ***. When editing the connection string, you can replace *** with a new password. If you leave ***, the original password will be preserved.
Edit a Database Connection String
To edit a database connection string:
- Highlight the row to edit and click the Edit ribbon button in the Database group, or right-click a row and select Edit.
Remove a Database Connection String
To remove a database connection string:
- Highlight the row to remove and click the Remove ribbon button in the Databases group, or right-click a row and select Remove. A confirmation dialog displays confirming "The selected row will be permanently deleted. Would you like to delete this row?".
Note: If you are using SQL Server 2008 or SQL Server 2008 R2, you cannot use Windows authentication for the user name. You must use a SQL user for authentication.
Web Sites
This feature requires the Website Search module and is not available for the Mac OS or Linux Agent. Specifying Websites in a policy applied to Mac OS and Linux endpoints has no effect.
Agents can crawl the specific website(s) and search the page text as well as any linked files.

Add Website Address
To add a website address:
- Click the Add ribbon button in the Websites group, or right-click anywhere in the website address list and select Add.
Be careful when specifying websites in a policy. All websites included in a policy are searched by all endpoints associated with the policy.
The Policy View displays the following columns when Web Sites is selected:
| Field | Description |
|---|---|
| Website Address | The url of the page on which to start the crawl. The address can be specified as http or https (if the site requires SSL). When specifying a site using https, the Username and Password columns must be populated with the appropriate credentials. For example, http://www.domain.com, http://www.domain.com/folder/intropage.html, https://secure.domain.com |
| Username | The username with which to authenticate to the specified website address when that address is using SSL. |
| Password | The password with which to authenticate to the specified website address when that address is using SSL. |
| Scope |
|
-
To remove a website address, highlight the row to be removed and click on the Remove ribbon button in the Websites group. Alternatively, you may right click on a row and select Remove. A confirmation dialog displays confirming "The selected row will be permanently deleted. Would you like to delete this row?".
SharePoint Sites
This feature requires the SharePoint Search module and is not available for the Mac or Linux Agent. Specifying SharePoint sites in a policy applied to Mac or Linux endpoints has no effect.
Spirion Windows Agents can search SharePoint sites and search the page text as well as any linked files.

To add a SharePoint address, click the Add ribbon button in the SharePoint group. Alternatively, you may right click anywhere in the SharePoint address list and select Add.
Be careful when specifying SharePoint sites in a policy. All SharePoint sites included in a policy are searched by all endpoints associated with the policy.
The Policy View displays the following columns when SharePoint Sites is selected:
| Field | Description |
|---|---|
| SharePoint Site Address |
|
| Domain | The domain name for on-premise Sharepoint installations. |
| Identity Provider ID | The relying trust identity provider value provided by the Active Directory Federation Services (ADFS). |
| Security Token Service | A token value that acts as a broker that sits between a relying party application and the end user provider by ADFS. |
| Username | The username with which to authenticate to the specified SharePoint site address when that address is using SSL. |
| Password | The password with which to authenticate to the specified SharePoint site address when that address is using SSL. |
To edit a SharePoint site, highlight the row to be edited and click the Edit ribbon button in the SharePoint Sites group. Alternatively, you may right click on a row and select Edit.
To remove a SharePoint site, highlight the row to be removed, and click the Remove button in the SharePoint Sites group. Alternatively, you may right click a row and select Remove. A confirmation dialog displays confirming "The selected row will be permanently deleted. Would you like to delete this row?".
There are a number of settings relevant to searching SharePoint sites. These settings are located under the category Settings\Locations\SharePoint in the Settings section of the policy.
Note: Spirion only searches the specific SharePoint URLs you provide. You need to provide the required authentication information of each individual site to be searched. In some instances the use of alternate user name conventions may be required by some SharePoint configurations.
Exchange Servers
This feature requires a license that includes the Exchange Server module and only displays when Exchange Servers are enabled in your license. This feature is not available for the Mac OS or Linux Agent. Specifying Exchange Servers in a policy applied to Mac OS or Linux endpoints will have no effect.

To add an exchange server to the policy click the Add ribbon button in the Exchange Servers Group. Alternatively, you may right click anywhere in the exchange server list and select Add. After clicking Add, a new row will appear in the Policy View with the following columns:
| Field | Description |
|---|---|
| Exchange Server | Specify the Exchange server that contains the desired mailboxes. This list will be populated with servers specified using the Edit Servers button. If the list is empty, then you will need to add exchange servers to the list using the Edit Servers button. |
| Mailbox | Specify the mailbox as a fully qualified Exchange mailbox in the form user@domain.com, for example: joesmith@acmecorp.com |
To modify an exchange server, highlight the row to be edited and click the Edit ribbon button in the Exchange Servers group. Alternatively, you may right click on a row and select Edit.
To remove an exchange server from the policy, highlight the row to be removed and click on the Remove ribbon button in the Exchange Servers group. Alternatively, you may right click on a row and select Remove. A confirmation dialog will display confirming "The selected row will be permanently deleted. Would you like to delete this row?".
To add an exchange server to the list click the Edit Servers ribbon button in the Exchange Servers group. Alternatively, you may right click anywhere in the exchange server list and select Edit Servers. A new window will open when you click Edit Servers with the following columns:
| Field | Description |
|---|---|
| Host URL | This field is required. The Exchange Web Service (EWS) URL, for example: https://WIN-EXCHG5.acmecorp.com/ews/Exchange.asmx |
| AD Host | Specify the host name or IP address of the Active Directory (AD) server if that name is different than the host specified in the EWS URL. |
| Host Version | Specify the version of Microsoft Exchange Server from the drop down list. The valid values are Exchange 2007, Exchange 2007 SP1, Exchange 2010, Exchange 2013 and Exchange 2016. |
| User Name |
Specify the user name of the account that will be used to perform the search. The user name should be specified as Domain\Username and must have sufficient permissions to search the specified mailboxes. This field is required. |
| Password | Specify the password for the specified user name. This field is required. |
| LDAP Query |
Optionally specify the LDAP query to use to find the mailbox store. The field can be left blank, can specify the DN of the mailbox store, or can specify the LDAP path to the mailbox attribute:
|
There are a number of settings relevant to searching Exchange Servers such as whether to include exchange servers in the search and whether to search all exchange servers or only the specified servers. These settings are located under the category Settings\Locations\Email\ExchangeServer in the Settings section of the policy.
File Hashes
File Hashes allows you to search for a representation of a file regardless of name or location. A file hash is the transformation of a string of characters into a usually shorter fixed-length value or a key that represents the original string. Using the shorter hashed key is a faster way to find the item than using the original value. You may either add a file and have the contents of that file transformed into a hash or import a file that already contains a list of valid file hashes.
To add a file hash, click the Add ribbon button in the File Hashes group. Alternatively, you may right click anywhere in the File Hash list and select Add. After a new row is added to the list click the browse button (the ...) to browse for a file. Select the file and click Open and a file hash of the contents of the file will display in the Hash column.
To import a list of file hashes, click the Import ribbon button in the File Hashes group. Alternatively, you may right click anywhere in the File Hash list and select Import. After a new row is added to the list click the browse button (the ...) to browse for a file. Select the file and click Open and a file hash of the contents will display in the Hash column. The import checks for duplicates in the list within the file as well as existing hashes on the policy that were added via to the Global Ignore List. When importing a list of file hashes, the file must be either a txt or a csv file. The format for files containing a list of file hashes is "hash, filename" (without the quotes). For example: 459DB8708F93BEAC0F75E149E1D990F6, hash one.txt
Note: A hash cannot have spaces within but any spaces before or after the hash (and before the comma) are removed. All spaces after the comma up to the first character are removed. All text after the comma is the file name including any spaces. File name is optional and if quotes are present they will be removed.

The Policy View displays the following columns when File Hashes is selected:
| Field | Description |
|---|---|
| Hash | Displays the file hash. |
| Original File Name | Displays the original name of the file. |
To edit a Hash, highlight the row to be edited and click the Edit ribbon button in the File Hashes group. Alternatively, you may right click on a row and select Edit. You may then click the browse button (the ...) to browse for a different file or reselect the same file if the contents of the file have changed since it was originally added to the file hashes list.
To remove a Hash, highlight the row to be removed and click on the Remove button in the File Hashes group. Alternatively, you may right click on a row and select Remove. A confirmation dialog displays confirming "The selected row will be permanently deleted. Would you like to delete this row?".
To enable searching by file hash, the following policy settings need to be configured.
- Settings\Locations\Files\FileAnalysisType - In order to enable searching by file hash, you need to configure this setting and select Compare file hash. When this setting is enabled, the search may take a longer time to complete as comparing file hashes is a more involved process.
- Settings\Locations\Files\SearchByFileHashType - This specifies the algorithm used to hash files when including file hashes as a search location in a Console policy. By default, the hast type is MD5.
Note: It is not possible to get a file hash match on compressed files or access databases.
Cloud Storage
Cloud Storage allows you to remotely search specific user accounts on cloud storage sites. Credentials for cloud storage sites must first be configured on the External Authentication page before you can add a provider to be searched.

To add a cloud storage site to be included in the search on the endpoint, click the Add ribbon button in the Cloud Storage Sites group. Alternatively, you may right click anywhere under the Cloud Storage Sites list and select Add. After clicking Add, a new row will appear in the Policy View.
The Policy View displays the following columns:
| Field | Description |
|---|---|
| Provider | The Cloud Storage provider. Click on the Cloud Storage Provider drop down and select the Cloud Storage provider - Dropbox, Box (Box Sync), Microsoft OneDrive or Google Drive (Cloud storage providers must first be configured on the Cloud Authentication page in order to display as a selection in the drop down). |
| User | Specify the user account to be searched. The user account would be one of the user email addresses associated with your cloud storage admin account (e.g. bob.smith@company.com). Enter one user account per line. If you want to search every user account linked to the admin account, leave this field blank. |
To import a list of cloud storage sites, click the Import ribbon button in the Cloud Storage Sites group. The list to be imported should be in CSV format with the content in the following format:
Provider,user
Provider,
Provider
Duplicate entries, whether already in the Cloud Storage Sites list or in the import file, will be ignored. Unauthorized providers will also be ignored.
There are a number of settings relevant to searching Cloud Storage locations which can be configured and are located under the category Settings\Locations\CloudDiscovery in the Settings section of the policy. These settings are described in the Policy Settings section on the Cloud Authentication Content page.
Google Gmail
Google Gmail allows you to remotely search specific user accounts on Google Gmail accounts.

To add a Google Gmail account to be included in the search on the endpoint, click the Add ribbon button in the Google Gmail group. Alternatively, you may right click anywhere under the Google Gmail account list and select Add. After clicking Add, a new row will appear in the Policy View.
The Policy View displays the following columns:
- Admin Account: The Google Gmail admin account. Click on the Admin Account drop-down and select the Admin Account. This list will be populated with Google Gmail accounts specified using the Edit Admins ribbon button in the Google Gmail group. If the list is empty, then you will need to add admin accounts to the list using the Edit Admins button.
- User: Specify the user account to be searched. The user account would be one of the user email addresses associated with your Google Gmail admin account (e.g. bob.smith@company.com). Enter one user account per line. If you want to search every user account linked to the admin account, leave this field blank.
To add an admin account to the list click the Edit Admins ribbon button in the Google Gmail group. Alternatively, you may right click anywhere in the Google Gmail account select Edit Admins.
A new window opens when you click Edit Admins with the following columns:
- Admin Account: Enter a valid Google Gmail Administrator account and then click the Authenticate button. When your Google Gmail credentials have been successfully authenticated you will see the following dialog:
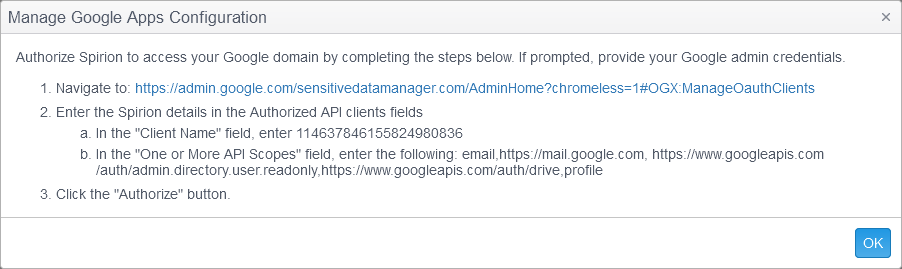
Click OK and the authorization is complete and Google Drive will now show (Authenticated).
You will also need to enable the following policy setting in the Settings section of a policy applied to the endpoint: Settings\Locations\Email\Gmail\IncludeGmailInEmailSearch